Friday, November 22, 2024

DIY Pallet Shed: How to Make a Simple Shed for Your Backyard

0 comments
DIY Pallet Shed: How to Make a Simple Shed for Your Backyard

DIY Pallet Shed: How to Make a Simple Shed for Your Backyard

Transform discarded pallets into a charming and functional backyard shed! This step-by-step guide shows you how to build a simple, yet sturdy, storage solution, saving you money and adding a unique touch to your outdoor space. Forget expensive pre-fabricated sheds; with a little elbow grease and these instructions, you'll have a personalized haven for your gardening tools, outdoor toys, or anything else that needs a safe, dry place to live. Let's get started!

Planning and Preparation: Laying the Foundation for Success

Before you even think about hammering a nail, careful planning is key. First, decide on the size and location of your pallet shed. Consider the available space in your backyard and the amount of storage you need. Measure carefully and mark out the area where your shed will stand. Next, gather your materials. You'll need reclaimed pallets (inspect them thoroughly for damage and pests!), screws (exterior-grade are essential!), a level, measuring tape, a drill, safety glasses, work gloves, and potentially additional lumber for reinforcement or a more finished look. Think about the overall aesthetic you're going for; rustic charm or something a little more refined? Your material choices will reflect that.

Choosing the Right Pallets

Not all pallets are created equal. Look for pallets made of sturdy hardwood, free from rot, warping, or excessive damage. Heat-treated pallets (marked with an HT stamp) are safer than chemically treated ones (marked with an MB stamp), which may contain harmful chemicals. Aim for pallets of consistent size and quality for easier construction. Consider buying more pallets than you think you need â€" you might need extras to replace damaged ones or to achieve the desired size and aesthetic.

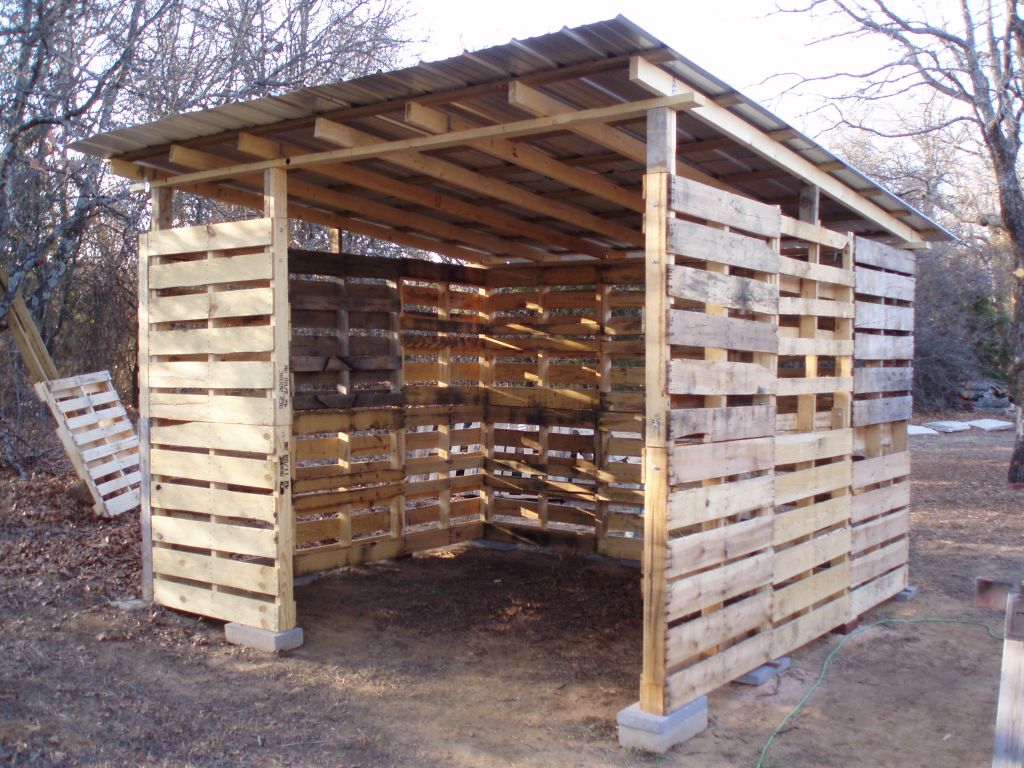
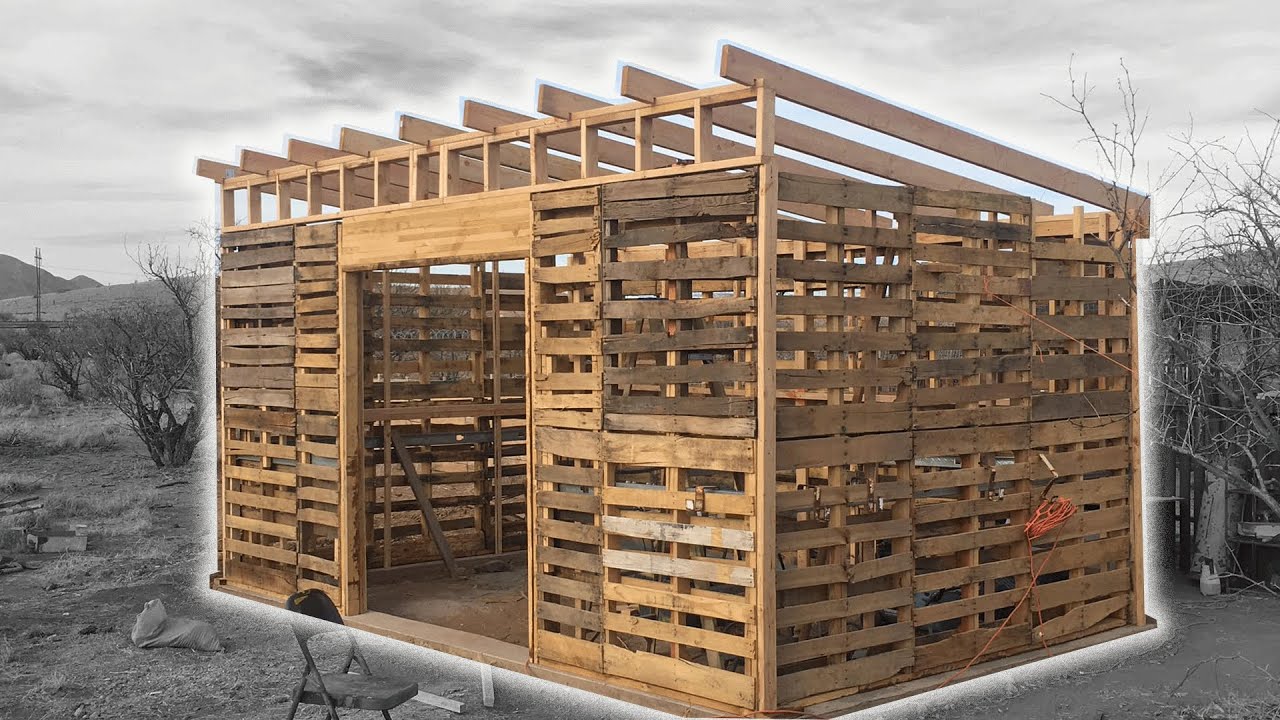
Construction: Building Your Pallet Shed

With your materials gathered and your plan in place, it's time to build! Begin by creating the base. You can simply lay down a layer of pallets on level ground or create a more permanent foundation using concrete blocks or pressure-treated lumber. This base provides stability and protects the bottom of your shed from moisture. Next, assemble the walls. You can stand pallets vertically or horizontally, depending on your design preference and the size of your pallets. Use screws to securely fasten the pallets together, creating a strong and stable structure. Remember to check frequently with your level to ensure everything remains plumb and square.

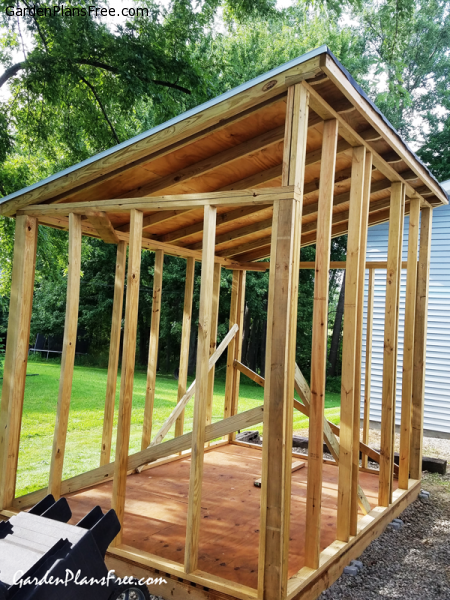
Adding Strength and Stability

To add extra stability, consider using additional lumber to reinforce corners and support the roof. You can create corner braces using 2x4s or other suitable lumber, screwing them firmly to the pallets. This step will prevent your shed from warping or becoming unstable over time. If the pallets themselves aren't strong enough, you can add support beams inside the structure to provide added strength.

Roofing and Finishing Touches: The Final Details

Constructing the roof requires careful planning and execution. You can use more pallets, or opt for a more traditional roofing material like plywood or corrugated metal sheeting. Remember to ensure the roof is sloped to allow for proper water drainage. Secure the roofing material to the top of the pallet structure with screws or nails, ensuring that the roofing overlaps for water tightness. Finally, consider adding a simple door. You can repurpose parts of extra pallets or purchase a pre-made door suitable for your project. Adding a latch or hasp will keep your belongings secure.

Personalizing Your Shed

Once the basic structure is complete, let your creativity shine! Consider painting your shed to match your home's exterior or choose a vibrant color that complements your garden. Add a weather-resistant sealant to protect the wood from the elements. You can also add shelves or other internal features to optimize storage. The possibilities are endless!

Building a DIY pallet shed is a rewarding project that allows you to create a unique and practical storage solution. By following these steps and letting your creativity flow, you can transform discarded materials into a beautiful and functional addition to your backyard.

Read more ►

Thursday, November 21, 2024

Free Pallet Shed Plans: Create a Practical Shed for Your Tools and Equipment

0 comments
Free Pallet Shed Plans: Create a Practical Shed for Your Tools and Equipment

Free Pallet Shed Plans: Create a Practical Shed for Your Tools and Equipment

Tired of tripping over garden tools and wrestling with overflowing storage bins? Imagine a neat, organized space dedicated to your equipment, built almost entirely from reclaimed materials â€" and at virtually no cost! This guide provides detailed, free pallet shed plans, empowering you to build a practical and attractive storage solution for your yard and garden.

Assessing Your Needs and Gathering Materials

Before diving into construction, carefully consider your shed's purpose. What will you store inside? How much space do you need? These questions dictate dimensions and design elements. For a simple, basic shed, you'll need approximately 15-20 standard-sized pallets in good condition. Inspect each pallet carefully for rot, loose boards, or significant damage; replace any compromised pieces with new lumber. Beyond the pallets, acquire these essential materials:

Essential Materials List:

  • Pressure-treated lumber: For the foundation, framing, and roof supports (quantity depends on shed size).
  • Roofing material: Tar paper, shingles, or corrugated metal â€" choose based on your budget and aesthetic preferences.
  • Fasteners: Galvanized nails, screws, and possibly construction adhesive for extra durability.
  • Tools: Hammer, saw (circular saw recommended), drill, level, measuring tape, safety glasses, work gloves.
  • Optional: Exterior paint or sealant to enhance weather protection and appearance.

Step-by-Step Construction Guide

This guide simplifies the process into manageable stages. Remember safety first! Always wear appropriate safety gear, and consider seeking assistance from a friend or family member, especially for lifting heavy pallets.

Foundation and Base Construction

Begin by constructing a sturdy foundation. Use pressure-treated lumber to build a rectangular frame based on your desired shed dimensions. Level this frame carefully. Then, create a base floor using more pressure-treated lumber, ensuring it rests securely within the frame. This provides a level and durable foundation for your pallet walls.

Erecting the Pallet Walls

Carefully position your pallets, securing them to the base and to each other using nails or screws. For stability, use multiple fasteners per connection. Consider staggering the pallet layers for added strength and a more visually appealing look. Ensure the walls are plumb and aligned throughout construction.

Roof Construction and Finishing Touches

Build a simple gable roof using more pressure-treated lumber. Secure the roof framing to the top of the pallet walls. Then, apply your chosen roofing material, ensuring it's waterproof and securely fastened. Finally, add optional features like a door (using salvaged materials or new lumber) and a window for ventilation and light. A coat of exterior paint or sealant significantly enhances the shed's lifespan and aesthetics.

Tips for Success and Customization

Plan carefully: Sketch your design and determine the exact quantity of pallets needed. This avoids mid-project material shortages. Prioritize safety: Wear safety gear throughout the project. Ask for assistance with heavy lifting. Customize your shed: Add features like shelves, hooks, or a work bench inside to personalize your storage space. Consider using reclaimed wood for added character. By following these simple steps and using your creativity, you can transform discarded pallets into a valuable, functional addition to your property. Enjoy the satisfaction of building something practical and beautiful with your own hands!

Read more ►

How to Make a Small Pallet Shed: A Simple Project for Your Yard

0 comments
How to Make a Small Pallet Shed: A Simple Project for Your Yard

How to Make a Small Pallet Shed: A Simple Project for Your Yard

Constructing a small shed from reclaimed pallets offers a budget-friendly and environmentally conscious solution for additional storage space in your yard. This project, while achievable for DIY enthusiasts with basic carpentry skills, requires careful planning and execution to ensure structural integrity and longevity. This comprehensive guide details each stage of the process, from material selection to final finishing, enabling you to build a functional and aesthetically pleasing pallet shed.

I. Planning and Preparation: Laying the Foundation for Success

The success of any construction project hinges on meticulous planning. Before commencing the construction of your pallet shed, several crucial steps must be undertaken to ensure a smooth and efficient building process. These preparatory steps will not only streamline the construction but also contribute to the overall quality and longevity of the finished structure.

A. Determining Shed Dimensions and Location

The initial step involves determining the desired dimensions of your shed. Consider the amount of storage space required and the available yard space. Accurate measurements are critical to ensure the pallets fit correctly and the shed meets your storage needs. Sketch a detailed plan, including dimensions, door placement, and any desired windows. Selecting an appropriate location is equally important. Ensure the site is level, has adequate drainage, and complies with any local building regulations or homeowner association guidelines. Consider factors such as sunlight exposure and proximity to other structures.

B. Sourcing and Assessing Pallets

The heart of this project lies in the pallets themselves. Sourcing high-quality, sturdy pallets is paramount. Inspect each pallet carefully for signs of rot, insect infestation, or significant damage. Choose pallets of consistent size and material; this will simplify construction and improve the overall aesthetic appeal. Ideally, pallets made of heat-treated wood (HT) are preferable, as they are less likely to contain harmful pests or chemicals. Ensure you acquire enough pallets to meet the dimensions of your planned shed. It is advisable to have a few extra pallets on hand to account for potential damage or unforeseen adjustments during construction.

C. Gathering Necessary Tools and Materials

Before you begin, compile a comprehensive list of necessary tools and materials. This will prevent delays and interruptions during the construction process. Essential tools include: a hammer, various sized nails or screws, a measuring tape, a level, a saw (circular saw or hand saw), a drill, safety glasses, work gloves, and possibly a pry bar for dismantling stubborn pallets. Materials will include: the reclaimed pallets, additional lumber for supports and framing (if needed), screws or nails, wood preservative or sealant, roofing material (e.g., corrugated metal sheets, asphalt shingles), and possibly hinges, a latch, and paint or stain for finishing.

II. Construction: Assembling Your Pallet Shed

With meticulous planning complete, the construction phase can commence. This stage requires careful attention to detail and adherence to safe working practices. Remember to prioritize safety by wearing appropriate protective gear throughout the entire process.

A. Foundation Preparation

Although a basic pallet shed may not require a complex foundation, preparing a level base is crucial for stability. Consider using compacted gravel or concrete pavers to create a level surface. This will prevent the shed from settling unevenly and ensure longevity. The foundation should be slightly larger than the base of your shed to provide adequate support.

B. Assembling the Frame

Begin assembling the shed frame by carefully laying out the pallets according to your pre-determined plan. Interlocking the pallets is generally the easiest and most secure approach. You may need to use additional lumber for support and reinforcement, particularly for the corners and any load-bearing points. Ensure the frame is square and level at each stage of construction, using your level and measuring tape for accuracy. Secure the pallets firmly with screws or nails, ensuring sufficient penetration for a strong bond.

C. Adding Walls and Roof

Once the base frame is securely in place, begin adding the remaining pallets to create the walls. Again, ensure proper alignment and secure fastening. The roof structure is equally crucial. Depending on the size and design, you may need to construct a separate roof frame using additional lumber before adding roofing material. Consider the weight of the roofing material when designing the roof support structure. Choose a durable and weather-resistant roofing material, such as corrugated metal or asphalt shingles, to protect the contents of your shed from the elements. Ensure proper sealing to prevent leaks.

D. Door and Window Installation

Incorporate the door and any windows into the design at this stage. You can create a simple door by using additional pallets or purchasing a pre-made door of appropriate size. Securely attach the door hinges and a latch mechanism. Windows can be created by cutting out sections of pallets or purchasing pre-made windows. Ensure adequate sealing around doors and windows to prevent drafts and water ingress.

III. Finishing Touches: Enhancing Aesthetics and Durability

With the basic structure complete, focus on enhancing the aesthetics and durability of your pallet shed. These final steps will protect your investment and enhance the overall curb appeal.

A. Treating and Sealing the Wood

Applying a wood preservative or sealant is crucial for protecting the pallets from the elements and extending the lifespan of your shed. This will help prevent rot, insect infestation, and weathering. Choose a high-quality product suitable for outdoor use. Apply multiple coats, allowing each coat to dry completely before applying the next.

B. Painting or Staining

Consider painting or staining your pallet shed to enhance its appearance and provide additional protection. This will not only improve the aesthetics but also offer further protection against weathering. Select a paint or stain designed for outdoor use and apply according to the manufacturer's instructions.

C. Final Inspections and Adjustments

Before deeming the project complete, conduct a thorough inspection. Check for any loose nails or screws, any gaps or cracks that need attention, and ensure the door and windows function correctly. Make any necessary adjustments or repairs to ensure the structural integrity and functionality of the shed.

Building a small pallet shed is a rewarding project that combines practicality with environmental consciousness. By carefully following these steps and prioritizing safety and attention to detail, you can create a functional and aesthetically pleasing storage solution for your yard.

Read more ►

How to Create a Wood Pallet Shed for Your Backyard with Simple Plans

0 comments
How to Create a Wood Pallet Shed for Your Backyard with Simple Plans

Constructing a Backyard Shed from Reclaimed Wood Pallets: A Comprehensive Guide

This comprehensive guide details the process of building a functional and aesthetically pleasing backyard shed utilizing reclaimed wood pallets. While seemingly a simple project, careful planning and execution are crucial for ensuring structural integrity and longevity. This guide provides a detailed, step-by-step approach, addressing material selection, preparation, construction, and finishing touches. Remember to always prioritize safety and adhere to local building codes.

Phase 1: Planning and Preparation

Before commencing construction, thorough planning is essential. This phase involves determining the shed's dimensions, location, required materials, and necessary tools. Careful consideration of these aspects will streamline the building process and minimize potential complications.

1.1 Defining Shed Specifications

The first step involves determining the desired dimensions of your shed. Consider the intended purpose: storage of gardening tools, bicycles, or other equipment. A larger shed will naturally require more materials and effort. Sketch a simple plan, noting the length, width, and height. Also, consider the placement of doors and windows, ensuring adequate access and ventilation.

1.2 Site Selection and Preparation

Choose a level and stable location for your shed. Avoid areas prone to flooding or excessive shade. Clear the chosen area of vegetation, debris, and any potential obstructions. Mark the boundaries of the shed's footprint using stakes and string to ensure accurate placement during construction. Leveling the ground is crucial for a stable structure. Consider using gravel or compacted soil to create a firm foundation.

1.3 Material Acquisition and Assessment

Sourcing Pallets: Reclaimed wood pallets are the foundation of this project. Source pallets from reputable sources, ensuring they are free from rot, significant damage, and harmful treatments. Inspect each pallet carefully, discarding any showing signs of deterioration. Ideally, select pallets constructed from pressure-treated lumber, which offers greater durability and resistance to moisture damage. However, ensure the treatment used is environmentally safe and suitable for outdoor use.

Additional Materials: Beyond pallets, you will need additional materials, including:

  • Concrete blocks or a similar foundation base.
  • Pressure-treated lumber for the base frame (if using a raised foundation).
  • Roofing materials (e.g., asphalt shingles, corrugated metal).
  • Hardware: screws, nails, hinges, door handle, window latches.
  • Wood sealant or paint (optional, for weather protection and aesthetics).

1.4 Tool Acquisition

Ensure you possess the necessary tools before starting. This list includes:

  • Hammer
  • Screwdriver (both Phillips and flathead)
  • Drill with drill bits (various sizes)
  • Measuring tape
  • Level
  • Saw (circular saw or hand saw)
  • Safety glasses
  • Work gloves
  • Pry bar (for separating pallet boards)

Phase 2: Construction

This phase involves the assembly of the shed's structure, encompassing the foundation, walls, roof, and doors. Each step requires precision and attention to detail to ensure structural integrity and stability.

2.1 Foundation Construction

Constructing a robust foundation is crucial. A simple and effective method involves using concrete blocks laid on a level surface. Alternatively, a raised wooden platform using pressure-treated lumber can be constructed. Ensure the foundation is level and provides adequate support for the shed’s weight.

2.2 Wall Construction

Disassemble the pallets carefully, removing the boards one by one. Inspect each board for damage and discard any unsuitable pieces. Construct the walls by vertically stacking and securing the pallet boards using screws or nails. Ensure the walls are plumb and square, using a level and measuring tape to check for accuracy. Consider adding cross-bracing for extra stability, especially in taller structures. For increased sturdiness, you can create a frame using additional lumber and attach the pallet boards to this frame.

2.3 Roof Construction

The roof design can vary. A simple gable roof is a good option for beginners. Construct the roof trusses using additional lumber, ensuring they are adequately supported by the wall structure. Once the trusses are in place, cover them with your chosen roofing material (e.g., asphalt shingles, corrugated metal). Secure the roofing material according to the manufacturer's instructions.

2.4 Door and Window Installation

Cut openings for doors and windows in the wall structure. Construct the doors using reclaimed pallet boards or new lumber. Install hinges and a handle to complete the door assembly. For windows, you can use salvaged windows or purchase inexpensive replacements. Securely install them using appropriate fasteners.

Phase 3: Finishing Touches and Maintenance

The final phase involves enhancing the shed's appearance and protecting it from the elements. This includes sealing or painting the wood, adding any desired accessories, and implementing a regular maintenance schedule.

3.1 Finishing and Protection

Apply a wood sealant or paint to protect the wood from moisture damage, insect infestation, and weathering. This step significantly extends the shed’s lifespan. Choose a high-quality exterior-grade sealant or paint designed for wood. Apply multiple coats for optimal protection, following the manufacturer's instructions.

3.2 Additional Features

Consider adding additional features to enhance functionality and aesthetics. This may include shelves for storage, a lock for security, or exterior lighting. These additions can personalize the shed and improve its usability.

3.3 Ongoing Maintenance

Regular maintenance is crucial for preserving the shed’s condition. Inspect the structure periodically for any signs of damage, such as loose boards or cracks. Address any issues promptly to prevent further deterioration. Re-apply sealant or paint as needed to maintain protection from the elements. This proactive approach will significantly extend the lifespan of your pallet shed.

Disclaimer: This guide provides general instructions. Always prioritize safety and consult with a professional if you have any doubts or concerns about the construction process. Adherence to local building codes and regulations is mandatory.

Read more ►

DIY Lean-To Shed: How to Create a Sturdy Shed for Your Yard

0 comments
DIY Lean-To Shed: How to Create a Sturdy Shed for Your Yard

DIY Lean-To Shed: How to Create a Sturdy Shed for Your Yard

So, you're thinking about building a shed? Fantastic! There's nothing quite like the satisfaction of creating something yourself, especially something as useful as a lean-to shed. They're perfect for storing garden tools, bikes, firewood â€" you name it. And while it might seem daunting at first, building a lean-to shed is totally doable, even for a relative beginner. This guide will walk you through the process, step-by-step, in a way that’s easy to understand.

Planning Your Lean-To Shed

Before you even think about grabbing a hammer, you need a plan. This isn't about architectural blueprints (unless you're feeling ambitious!), but a solid understanding of what you want to achieve. Consider these key factors:

Size and Purpose

How much stuff do you need to store? A small lean-to might be perfect for a few tools, while a larger one can handle bikes, lawnmowers, and more. Think about the dimensions carefully. Too small, and you'll be cramped. Too big, and you'll waste materials and money.

Location, Location, Location

Where will your shed go? You'll need a level area, preferably against an existing wall or fence for support. Consider sun exposure (you might want some shade) and access. You want it to be easy to get to, but not in the way.

Materials

This is where things get a bit more specific. You'll need:

  • Pressure-treated lumber: This resists rot and insects, crucial for outdoor structures. Think about the size of the lumber â€" 4x4 posts are common for the supports, and 2x4s for the framing.
  • Plywood or OSB (Oriented Strand Board): For the walls and roof. Plywood is often a bit more expensive but can be easier to work with.
  • Roofing material: Asphalt shingles are a popular and relatively inexpensive choice. You could also consider metal roofing for durability.
  • Fasteners: Plenty of nails, screws, and possibly bolts for the sturdier parts.
  • Concrete mix (optional): If you're setting posts in the ground, concrete will provide a strong foundation.
  • Tools: Measuring tape, level, saw (circular saw is helpful but a hand saw will work), hammer, drill, post hole digger (or shovel), and safety glasses.

Building Your Lean-To Shed: A Step-by-Step Guide

Okay, let's get building! This is a simplified version; always refer to your local building codes and safety guidelines.

Step 1: Prepare the Foundation

Clear the area and level the ground. If you're using posts, dig holes (about 2-3 feet deep) and set them in concrete. Let the concrete cure completely before proceeding (usually 24 hours).

Step 2: Frame the Structure

Attach the main support beams (your 4x4s) to the existing wall or fence and the posts you’ve set. Make sure everything is level and plumb (perfectly vertical). Next, frame the walls and roof using 2x4s. You'll likely want to create a slightly angled roof to allow for water runoff.

Step 3: Sheathing the Walls and Roof

Now it's time to cover the frame. Attach the plywood or OSB sheeting to the walls and roof, ensuring good alignment and secure fastening. Use appropriate nails or screws for the material you chose.

Step 4: Roofing

Install your chosen roofing material according to the manufacturer’s instructions. This is often the most technical step, so take your time and follow the directions carefully. Make sure you have proper ventilation to avoid moisture build-up.

Step 5: Finishing Touches

Add any finishing touches like trim, a door (if desired), and a lock. Consider adding a simple shelf or two inside for extra storage.

Tips for Success

  • Measure twice, cut once: This is the golden rule of any DIY project. Accurate measurements save time and materials.
  • Work with a friend: Building a shed is easier with an extra set of hands.
  • Take breaks: Don't try to do everything in one day. Break the project into manageable chunks.
  • Check your work regularly: Make sure everything is level and plumb throughout the process.
  • Prioritize safety: Always wear safety glasses and appropriate clothing. Use caution when operating power tools.

Commonly Asked Questions

Here are some questions people frequently ask about building lean-to sheds:

Q: Do I need a permit to build a lean-to shed?

A: This depends on your local building codes. Check with your city or county’s planning department before starting. Small lean-tos often don't require permits, but it's always best to be sure.

Q: How long does it take to build a lean-to shed?

A: This varies depending on the size and your experience. A small shed could be built in a weekend, while a larger one might take several weekends.

Q: How much does it cost to build a lean-to shed?

A: The cost depends on the size and materials you choose. Expect to spend a few hundred dollars to a couple of thousand, depending on the complexity and size.

Q: Can I build it alone?

A: You can, but it will be much harder and potentially slower. Having a helper makes the process significantly easier, especially for lifting and positioning heavier materials.

Q: What if I don't have any building experience?

A: Don't worry! There are tons of resources available, including online tutorials, books, and even classes. Start with a smaller, simpler project if you're unsure, and gradually build your skills.

Building a lean-to shed is a rewarding experience. With a little planning and effort, you can create a valuable addition to your yard. Remember to prioritize safety and take your time; the result will be well worth it!

Read more ►

Wednesday, November 20, 2024

Small Pallet Shed: A Simple and Practical Storage Solution for Your Yard

0 comments
Small Pallet Shed: A Simple and Practical Storage Solution for Your Yard

Small Pallet Shed: A Simple and Practical Storage Solution for Your Yard

Okay, so you've got stuff. We all do! Garden tools, lawn furniture, holiday decorations â€" the list goes on and on. And let's be honest, that overflowing shed or cluttered garage is starting to feel like a real eyesore. Wouldn't it be amazing to have a dedicated, organized space for all those things, without breaking the bank or spending weeks on a complicated DIY project? Well, guess what? You can! Building a small pallet shed is a surprisingly easy and affordable way to tackle your storage woes. Let me tell you all about it.

Why Choose a Pallet Shed?

Before we dive into the nitty-gritty, let's talk about why pallet sheds are such a fantastic option. First off, cost-effectiveness is a huge win. Reclaimed pallets are often free or very cheap to acquire â€" you might even find some sitting unused behind a local business. Secondly, it's surprisingly eco-friendly. You're repurposing materials that would otherwise end up in a landfill. Plus, with a little creativity, you can build a shed that's both functional and aesthetically pleasing, fitting seamlessly into your yard's design. Finally, it's a relatively quick project, meaning you can have your new storage solution up and running in a weekend (or maybe a long weekend, depending on your skills and ambition!).

Planning Your Pallet Shed Project

Now, let's get organized! Before you even think about hammering a nail, you need a plan. This doesn't need to be an architectural masterpiece, but a bit of foresight will save you headaches later on.

Choosing Your Pallets

The quality of your pallets will significantly impact your shed's durability. Look for pallets that are sturdy, with minimal damage. Heat-treated pallets (marked with an HT stamp) are generally safer to use than chemically treated ones (marked with an MB stamp). Avoid pallets that are visibly rotted, cracked, or warped. You'll need to figure out how many pallets you'll need based on the size of the shed you envision. Start small; a 4x4 or 4x6 foot shed is a great starting point.

Design and Dimensions

Think about the dimensions of your shed based on the space you have and what you need to store. Sketch out a simple plan, noting the placement of walls, door, and roof. Consider adding features like shelves or a small workbench inside if you need extra organization.

Gathering Your Tools and Materials

Besides the pallets themselves, you'll need a few basic tools and materials:

  • Hammer
  • Nails (various sizes)
  • Screws (for added strength)
  • Drill (optional, but recommended for easier screw installation)
  • Measuring tape
  • Level
  • Safety glasses
  • Work gloves
  • Roofing material (tar paper, corrugated metal, or even recycled plastic sheeting)
  • Optional: Paint or stain for weather protection and aesthetics

Building Your Pallet Shed: A Step-by-Step Guide

Alright, let's build! This is a simplified guide; you can find more detailed instructions online if you need them. Remember safety first! Wear your safety glasses and gloves throughout the entire process.

The Base

Start by creating a sturdy base. This can be a simple concrete slab, a compacted gravel base, or even just a layer of treated lumber. The base protects your pallets from moisture and provides stability for your shed.

Building the Walls

Begin assembling the walls of your shed by connecting pallets together. You might use nails or screws, depending on your preference and the condition of the pallets. Ensure the walls are level and square. A simple frame made from stronger lumber can add extra support and stability to the structure.

Adding the Roof

The roof is a crucial part of protecting your belongings. You can create a simple gable roof using more pallets or opt for a flatter roof with corrugated metal sheeting or other roofing material. Secure the roofing material to the top of the walls to ensure weather resistance.

Adding a Door

Cut a door opening into one of your walls using a hand saw or circular saw. This is where careful planning pays off! Frame the door opening with stronger lumber for stability. You can then create a door using more pallets or even reclaimed wood. Hinges and a simple latch will complete your door.

Finishing Touches and Customization

Once the basic structure is complete, it's time for the fun part â€" customization! You can paint or stain your shed to match your yard's aesthetic. Consider adding a small window for ventilation and light. If you're feeling ambitious, you could even build shelves or a small workbench inside to maximize storage space.

Maintaining Your Pallet Shed

While pallet sheds are sturdy, a little maintenance goes a long way. Regularly inspect for any damage or signs of rot. Apply a fresh coat of paint or sealant every few years, especially if your shed is exposed to harsh weather conditions. Keep it clean and well-ventilated to prevent moisture build-up.

Commonly Asked Questions

Q: How long does it take to build a pallet shed?

A: The time required depends on the size and complexity of your design, as well as your experience with DIY projects. A basic 4x4 foot shed could be built in a long weekend, while a larger or more elaborate structure might take longer.

Q: Are pallet sheds weatherproof?

A: While pallets provide some natural protection, proper sealing and roofing are essential to make your shed truly weatherproof. Consider using a weather-resistant sealant on the pallets and choosing durable roofing materials.

Q: Are all pallets suitable for building a shed?

A: No. Avoid pallets that show signs of significant damage, rot, or chemical treatment (unless you're certain it's safe). Heat-treated pallets are generally the best option.

Q: Can I use a pallet shed for storing anything?

A: While pallet sheds are great for many items, avoid storing highly sensitive electronics or things susceptible to moisture damage unless you have taken extra steps to waterproof the shed.

Q: What if I don't have any carpentry skills?

A: Don't worry! Building a simple pallet shed is achievable even for beginners. There are tons of online resources, tutorials, and videos that can guide you through the process. Take your time, and don't be afraid to ask for help if you need it.

So there you have it! Building a small pallet shed is a fun, affordable, and sustainable way to add extra storage space to your yard. Get started on your project today and enjoy the satisfaction of creating something useful and beautiful with your own two hands!

Read more ►

DIY Wood Pallet Shed: A Sustainable Storage Solution for Your Yard

0 comments
DIY Wood Pallet Shed: A Sustainable Storage Solution for Your Yard

DIY Wood Pallet Shed: A Sustainable Storage Solution for Your Yard

Tired of clutter overflowing your garage or garden shed? Craving a charming, eco-friendly storage solution that adds character to your outdoor space? Building your own shed from reclaimed wood pallets offers a fantastic blend of sustainability, affordability, and personalized style. This guide provides a step-by-step approach to crafting a sturdy and attractive pallet shed, transforming discarded materials into a valuable asset for your property.

Planning Your Pallet Shed Project

Before you begin hammering nails, careful planning ensures a successful build. First, determine the size and dimensions of your desired shed. Consider the storage needs you want to fulfill, along with the available space in your yard. Next, source your pallets. Look for sturdy pallets made of untreated wood â€" inspecting them thoroughly for any signs of rot or pest infestation is crucial. Remember to obtain any necessary permits from your local authorities before beginning construction. Finally, sketch a basic design, noting the placement of walls, doors, and roof. A simple design is often best for a beginner, focusing on functionality over intricate details.

Gathering Your Materials and Tools

Building your pallet shed requires a blend of reclaimed and new materials. Beyond the pallets themselves, you’ll need strong screws or nails, pressure-treated lumber for the foundation (to prevent rot), roofing materials (tar paper, shingles, or metal sheeting), hinges and a latch for the door, and any desired paint or sealant. For tools, gather a hammer or impact driver, saw (circular saw or hand saw), measuring tape, level, drill, and safety glasses and gloves. Remember to prioritize safety throughout the project.

Constructing the Shed's Foundation and Frame

Building a Solid Base

Begin by creating a level foundation using pressure-treated lumber. This prevents the shed from sinking into the ground and ensures longevity. Construct a rectangular frame using the pressure-treated wood, anchoring it securely to the ground with concrete or stakes. Ensure the frame is perfectly level using a level to prevent structural issues later on.

Assembling the Pallet Walls

Next, begin assembling the pallet walls. This might involve dismantling some pallets to create consistent wall sections. Secure the pallets together using screws or strong nails, reinforcing the joints for added strength and stability. Remember to leave space for your door opening.

Erecting the Frame and Attaching Walls

Once the walls are assembled, carefully lift and attach them to the foundation frame, ensuring they are plumb and square. Use additional bracing to secure the walls firmly to the base. This is where a helping hand (or two) will prove invaluable.

Adding the Roof and Finishing Touches

The roof is a crucial element for protecting your stored items from the elements. Construct a simple gable or shed roof using additional lumber. Ensure the roof is properly sloped to allow for efficient water runoff. Cover the roof with your chosen roofing material, carefully sealing any gaps to prevent leaks. Finally, add the door using hinges and a latch. Consider applying a protective sealant or paint to the entire shed to enhance its lifespan and aesthetic appeal. Adding personal touches, such as a small window or decorative trim, can further personalize your creation.

Enjoy Your Sustainable Storage Solution!

Congratulations! You’ve successfully built your own unique and sustainable pallet shed. This project not only provides valuable storage space but also showcases your resourcefulness and commitment to eco-friendly practices. Enjoy the satisfaction of knowing you transformed discarded materials into a beautiful and functional addition to your yard. Remember to regularly maintain your shed, addressing any repairs promptly to ensure its long-term durability.

Read more ►

10x12 Pallet Shed: A Budget-Friendly DIY Storage Solution

0 comments
10x12 Pallet Shed: A Budget-Friendly DIY Storage Solution

10x12 Pallet Shed: A Budget-Friendly DIY Storage Solution

The desire for additional storage space is a common dilemma faced by homeowners and property owners alike. Traditional storage solutions, such as prefabricated sheds or custom-built structures, often come with substantial price tags. However, a resourceful and cost-effective alternative exists: constructing a 10x12 pallet shed. This project offers a viable path to expanding storage capacity while significantly minimizing financial outlay. This comprehensive guide details the process of designing, constructing, and maintaining a durable and aesthetically pleasing pallet shed, perfect for a variety of storage needs.

Planning and Design Considerations

Before commencing construction, meticulous planning is paramount. This stage encompasses several key aspects, directly impacting the final product's functionality, durability, and aesthetic appeal. A well-defined plan minimizes unforeseen complications and maximizes efficiency throughout the building process.

Site Selection and Preparation

Choosing the appropriate location for the shed is crucial. Consider factors such as accessibility, proximity to existing structures, and the terrain. Ensure the chosen site is level and provides adequate drainage to prevent water accumulation around the shed's foundation. Clear the area of any vegetation, debris, or obstacles that might interfere with construction.

Material Acquisition and Pallet Selection

The foundation of this project rests on the selection and acquisition of pallets. Prioritize heat-treated pallets (marked with HT) over chemically treated pallets (marked with MB) due to safety concerns regarding potential chemical exposure. Inspect each pallet for damage, rot, or infestation. Select pallets of consistent size and quality to ensure structural integrity. Estimate the required number of pallets based on the desired shed dimensions (a 10x12 shed will require a substantial quantity). Consider sourcing pallets from local businesses or recycling centers to reduce costs.

Design and Dimensions

While a 10x12 footprint is a common starting point, refine the dimensions based on your specific storage needs. Create detailed sketches or utilize design software to visualize the shed's structure, including wall heights, roof pitch, and door placement. Determine the number of pallets required for each wall, considering both vertical and horizontal placement to maximize strength and stability. Consider adding features like windows or ventilation to improve air circulation and prevent moisture buildup.

Construction Phase: A Step-by-Step Guide

The construction phase demands careful execution, adherence to safety protocols, and attention to detail. This section provides a structured overview of the building process, from foundation to roof completion.

Foundation Preparation

A sturdy foundation is vital for a long-lasting shed. While a concrete slab is ideal, a more budget-friendly option involves creating a gravel base. Level the ground, excavate to a suitable depth, and compact a layer of gravel. This provides drainage and a stable surface for the pallet foundation.

Pallet Wall Construction

Construct the shed's walls by strategically arranging and securing the pallets. Use appropriate fasteners such as screws or nails, ensuring consistent spacing and alignment. For added strength, consider using metal brackets or connecting plates at key junctions. Vertical pallets form the framework, with horizontal pallets acting as infill for added stability and weather resistance.

Roof Construction

The roof design significantly impacts the shed's weather resistance. A simple gable roof is a cost-effective and relatively easy-to-construct option. Ensure the roof's pitch is sufficient for effective water runoff. Use additional pallets for framing the roof structure and consider using plywood or OSB sheathing for a more weatherproof finish. Apply a suitable roofing material such as tar paper or metal roofing to protect the shed's contents from the elements.

Door Installation and Finishing Touches

Install a sturdy door, ensuring a secure fit and weather-resistant seal. Consider adding hinges and a locking mechanism for security. To enhance the shed's aesthetic appeal and weather protection, apply a sealant or weatherproofing treatment to the exposed pallet surfaces. A coat of paint or stain can further improve the shed's appearance and longevity.

Essential Considerations for Durability and Longevity

The longevity of your pallet shed hinges on several factors. Regular maintenance and proactive measures can significantly extend its lifespan and prevent premature deterioration.

Weatherproofing and Protection

Regularly inspect the shed for signs of damage, rot, or pest infestation. Apply a fresh coat of weatherproofing sealant or paint as needed, focusing on areas exposed to the elements. Maintain proper drainage to prevent water accumulation around the foundation.

Pest and Rot Prevention

Regularly inspect the pallets for signs of insect infestation or rot. Address any issues promptly to prevent widespread damage. Consider using a pest control treatment to deter insects and rodents. Ensure adequate ventilation to prevent moisture buildup, a common cause of rot.

Regular Maintenance

Conduct periodic inspections of the shed's structural integrity, paying close attention to fasteners, joints, and roofing. Tighten any loose fasteners and repair any damaged sections promptly. Regular cleaning will help maintain the shed's appearance and extend its life.

Conclusion: A Cost-Effective and Sustainable Solution

Constructing a 10x12 pallet shed presents a compelling alternative to traditional storage solutions. This project offers a significant cost advantage while providing valuable additional storage space. By following the detailed steps outlined in this guide, along with diligent planning and execution, homeowners can successfully build a durable, functional, and aesthetically pleasing structure to meet their storage needs. The inherent sustainability of utilizing recycled pallets further enhances the appeal of this cost-effective and environmentally conscious approach to storage expansion.

Read more ►

DIY 8x12 Lean-To Storage Shed Plans for Simple Backyard Organization

0 comments
DIY 8x12 Lean-To Storage Shed Plans for Simple Backyard Organization

DIY 8x12 Lean-To Storage Shed: Your Backyard Organization Savior!

Okay, so you're looking to tame that backyard clutter beast, huh? I get it. Between lawn tools, gardening supplies, and all those "I'll-need-this-someday" items, it can feel like your yard's becoming a storage landfill. But fear not, fellow organizer! Building your own 8x12 lean-to storage shed is totally doable, even if you're not a seasoned carpenter. This guide will walk you through the process, keeping it simple and straightforward, perfect for the DIY enthusiast.

Planning Your Lean-To Shed Paradise

Before you even think about grabbing a hammer, let's get organized (ironic, I know!). Planning is key to a successful project. We're aiming for an 8x12 lean-to shed â€" meaning it'll be attached to an existing structure like your house or garage. This makes the construction a little easier because you'll have one side already built!

Choosing Your Location

Think carefully about where this beauty will go. Consider:

  • Accessibility: Do you want easy access from your house or a specific part of the yard?
  • Sunlight/Shade: Some items might need protection from the elements. Think about sun exposure and potential rain.
  • Ground conditions: Is the ground level and stable? You'll likely need a level foundation.
  • Local regulations: Check your local building codes and HOA rules before you start building. You might need permits!

Gathering Your Materials

This is where a detailed list comes in handy. Don't underestimate the power of a well-stocked shopping list! You'll need:

  • Pressure-treated lumber: For the foundation, framing, and roofing. The pressure treatment helps with rot and insect resistance.
  • Plywood or OSB sheeting: For the walls and roof sheathing. OSB is usually cheaper.
  • Roofing material: Asphalt shingles are common and relatively inexpensive. Consider metal roofing for longevity.
  • Concrete blocks or gravel: For the foundation. Concrete blocks are more stable.
  • Fasteners: Nails, screws, bolts â€" get a variety of sizes to be safe.
  • Building paper or house wrap: To protect the sheathing from moisture.
  • Paint or sealant (optional): For added protection and aesthetics.
  • Tools: Measuring tape, level, saw (circular saw is recommended), hammer, drill, shovel, etc.

Construction: Let's Build!

Now for the fun part! Remember, safety first! Wear safety glasses, gloves, and appropriate clothing. Take your time, double-check your measurements, and don't hesitate to ask for help if needed.

Foundation

Start with a solid foundation. For an 8x12 lean-to, a simple foundation of concrete blocks or a gravel base will work well. Ensure it's level to prevent problems down the road. You'll want to create a level base that matches your existing structure's height to ensure a proper lean-to fit.

Framing

Once your foundation is set, you'll build the frame. This involves creating the floor joists, wall studs, and roof rafters. Use your pressure-treated lumber to create a sturdy frame. Remember to check your measurements frequently to keep everything square and level. This is where a helper can be incredibly valuable!

Sheathing and Roofing

After framing, you'll attach the plywood or OSB sheeting to the walls and roof. This is the "skin" of your shed. Ensure you leave space for doors and windows if you want to add them (consider pre-hung exterior doors and windows for easier installation). Before applying your roofing material, add a layer of building paper to create a moisture barrier. Then, install your chosen roofing material, following the manufacturer's instructions.

Finishing Touches

Time for the finishing touches! Install a door (if desired), add any windows, and paint or seal your shed as needed. Consider adding a shelf or two inside to maximize your storage space.

Tips for Success

  • Take your time: Rushing the process can lead to mistakes. Patience is key!
  • Check your measurements constantly: Accuracy is crucial for a sturdy and aesthetically pleasing shed.
  • Ask for help: Don't be afraid to ask a friend or family member for assistance.
  • Read instructions carefully: Always follow the instructions provided with your materials.
  • Have fun!: Building your own shed is a rewarding experience. Enjoy the process!

Commonly Asked Questions

Q: Do I need a building permit? A: It depends on your local regulations. Check with your local building department to find out.

Q: How much will this cost? A: The cost varies depending on the materials you choose. You can expect to spend anywhere from a few hundred to a thousand dollars or more.

Q: How long will it take to build? A: The construction time depends on your experience and how much time you can dedicate to the project. It could take a weekend to a couple of weeks.

Q: Can I build this alone? A: While possible, having a helper would significantly ease the construction, especially during framing and roofing.

Q: What kind of wood should I use? A: Pressure-treated lumber is highly recommended for its rot and insect resistance.

Q: Can I add electricity? A: You can, but it will require some additional planning and possibly an electrician's assistance. You'll need to ensure proper wiring and electrical safety precautions.

Building your own lean-to shed is a fantastic way to increase your backyard storage and enjoy a rewarding DIY project. So grab your tools, gather your materials, and let's get building!

Read more ►

8x12 Shed Plans with Materials List for Budget-Conscious Builders

0 comments
8x12 Shed Plans with Materials List for Budget-Conscious Builders

Building Your Dream 8x12 Shed on a Budget

The allure of a spacious 8x12 shed is undeniable. It promises ample storage for garden tools, bicycles, or even a cozy workshop. But the cost of construction can often be a deterrent. This comprehensive guide provides detailed 8x12 shed plans and a materials list tailored for budget-conscious builders, allowing you to realize your storage dreams without breaking the bank. We'll focus on practical solutions and cost-saving strategies throughout the entire building process, ensuring you achieve a sturdy and functional shed within your financial limits.

Planning Your Budget-Friendly 8x12 Shed

Before you even touch a hammer, meticulous planning is key. Start by sketching out your shed's design. Consider its purpose â€" will it primarily store tools, serve as a workshop, or house outdoor equipment? This dictates the internal layout, including shelving, workbench placement, and overall organization. Next, create a detailed budget. Factor in the cost of every component, from lumber and roofing materials to hardware and fasteners. Research prices at multiple suppliers to find the best deals, and don't forget to account for potential unexpected costs like extra lumber or unforeseen repairs. A realistic budget ensures you avoid costly overruns and remain within your financial comfort zone.

Choosing the Right Materials: Smart Savings for Your Shed

Material selection significantly impacts your budget. Opting for readily available and affordable materials doesn't necessarily mean sacrificing quality. For example, pressure-treated lumber offers excellent durability and resistance to rot and insects, making it an ideal choice for the shed's foundation and framing. Consider using slightly less expensive alternatives for siding, such as composite materials or even reclaimed wood if you can source it sustainably. When choosing roofing materials, asphalt shingles offer a good balance between affordability and longevity. Remember to purchase your materials in bulk to potentially negotiate better prices and minimize transportation costs.

Detailed Materials List for an 8x12 Shed:

This list provides estimated quantities; adjust based on your specific design and local lumber dimensions.

  • Pressure-treated 4x4 posts: 8
  • Pressure-treated 2x6 lumber: Approximately 150 linear feet for framing
  • Plywood sheathing (½ inch): Enough to cover the walls and roof
  • Siding (your chosen material): Sufficient to cover the exterior walls
  • Asphalt shingles: Enough for the roof area
  • Roofing felt: One roll
  • Nails, screws, and other fasteners: Purchase a variety pack for diverse needs.
  • Door and window frames (pre-hung if possible): 1 door, potentially 1 or 2 windows depending on design
  • Hardware: Hinges, handles, locks

Construction: Step-by-Step Guide for Budget Builders

Begin by preparing the foundation. A simple concrete slab is ideal for stability and longevity, but gravel pads are a cost-effective alternative. Next, erect the frame using your chosen lumber. Ensure all corners are square and plumb for a structurally sound shed. Sheathe the walls and roof with plywood, then install your chosen siding material. Carefully install the roofing felt before adding the asphalt shingles. Finally, hang the door and any windows, and add the finishing touches, such as trim and hardware. Taking your time and following each step precisely ensures a well-constructed and safe shed.

Maximizing Your Savings: Tips and Tricks

Seek assistance from friends or family: Enlisting help reduces labor costs significantly. Repurpose existing materials: Use salvaged or reclaimed wood whenever possible. Shop around for the best prices: Compare prices from different lumberyards and home improvement stores. Utilize free resources: Explore online tutorials and free shed plans. Building an 8x12 shed on a budget requires careful planning and resourcefulness. By following these guidelines and prioritizing smart material selection and construction techniques, you can create a durable and functional storage solution without exceeding your financial constraints.

Read more ►

Tuesday, November 19, 2024

Practical 6x8 Gable Shed Plans for Outdoor Storage and Organization

0 comments
Practical 6x8 Gable Shed Plans for Outdoor Storage and Organization

Practical 6x8 Gable Shed Plans for Outdoor Storage and Organization

This document provides comprehensive plans for constructing a practical and robust 6x8 gable shed, ideal for various outdoor storage and organization needs. The design emphasizes ease of construction for DIY enthusiasts while ensuring structural integrity and weather resistance. Detailed specifications, material lists, and step-by-step instructions are provided to facilitate a successful building project.

I. Foundation and Site Preparation

A solid foundation is crucial for the longevity and stability of any shed. The 6x8 gable shed, though relatively small, still requires proper preparation to prevent settling and potential damage. This section details the recommended foundation options and site preparation procedures.

A. Site Selection and Leveling

Choose a level, well-drained location for your shed. Avoid areas prone to flooding or excessive shade. Clear the area of any vegetation, debris, or rocks. Utilize a level to ensure the ground is perfectly flat, adjusting as needed with fill dirt or excavation. Proper leveling is paramount to prevent uneven settling and potential structural issues.

B. Foundation Options

Several foundation options are suitable for a 6x8 gable shed, each with its own advantages and disadvantages:

  • Concrete Slab: Offers the most durable and level foundation. Requires concrete pouring and finishing, necessitating specific tools and expertise. Consider reinforcing the slab with rebar for increased strength.
  • Gravel Base: A more cost-effective and simpler option. Involves creating a compacted gravel base, ensuring proper drainage. Suitable for well-drained locations but might be less stable in shifting soils.
  • Pressure-Treated Skids: A straightforward approach, ideal for DIY projects. Requires pressure-treated lumber, providing a raised foundation and excellent air circulation. Regular inspection for rot or insect damage is necessary.

C. Anchor Bolts (If Applicable)

For concrete or gravel foundations, consider using anchor bolts to secure the base plates of the shed's frame. This will significantly enhance stability, especially in areas prone to strong winds. Ensure the bolts are adequately embedded in the foundation.

II. Frame Construction

The frame constitutes the shed's skeletal structure, demanding precise measurements and careful assembly. The use of pressure-treated lumber is strongly recommended for all structural elements to enhance durability and resist rot and insect infestation. This section details the frame construction process.

A. Building the Floor Frame

Construct a robust floor frame using pressure-treated 2x6 lumber. Layout the frame based on the 6x8 dimensions, ensuring squareness using a diagonal measurement check. Secure the frame using appropriate fasteners, such as galvanized screws or nails.

B. Erecting the Wall Frames

Build four wall frames using pressure-treated 2x4 lumber, ensuring verticality and squareness. The height of the walls will depend on the desired overall shed height. Use appropriate bracing during construction to maintain the frame's integrity.

C. Constructing the Gable End Frames

The gable ends contribute to the shed's distinctive roofline. Construct two identical gable end frames, calculating the angles carefully to achieve the desired slope. Use appropriate bracing to ensure strength and stability during and after construction.

D. Assembling the Frame

Assemble the complete frame by connecting the wall frames to the floor frame and the gable end frames to the wall frames. Use appropriate fasteners and bracing to ensure structural integrity. Ensure all connections are securely fastened and aligned.

III. Roofing and Siding

The roof and siding provide weather protection and aesthetic appeal. Choosing appropriate materials is crucial for ensuring durability and longevity. This section details the roofing and siding installation process.

A. Roofing Installation

Install roof sheathing (plywood or OSB) over the gable end frames and top plates of the wall frames. Then, install your chosen roofing material. Options include asphalt shingles, metal roofing, or corrugated plastic sheeting. Follow the manufacturer's instructions carefully for proper installation and sealing.

B. Siding Installation

Apply the siding material to the exterior of the shed's wall frames. Common options include vinyl siding, wood siding, or metal siding. Ensure proper overlap and sealing to prevent water penetration. Follow the manufacturer's instructions for best results.

C. Door and Window Installation (If Applicable)

If including a door and/or windows, carefully cut the openings in the wall frames prior to siding installation. Install the door and window frames, ensuring proper alignment and sealing. Use appropriate weatherstripping to prevent drafts and moisture intrusion.

IV. Finishing Touches

This section covers final details that enhance the functionality and aesthetic appeal of the shed. These details ensure long-term usability and protection.

A. Painting or Staining

Apply a protective layer of paint or stain to all exterior wood surfaces to enhance weather resistance and visual appeal. Choose a high-quality exterior-grade paint or stain suitable for the type of wood used.

B. Interior Finishing

Depending on the intended use, consider adding interior finishes such as shelving, pegboards, or cabinets to enhance storage capabilities. Use moisture-resistant materials for the interior.

C. Ventilation

Adequate ventilation is essential to prevent moisture buildup and potential damage. Install vents in the gable ends or side walls to promote airflow.

V. Material List (Example)

This is a sample material list. Adjust quantities based on your specific needs and chosen materials.

  • Pressure-treated 2x4 lumber: Approximately 100 linear feet
  • Pressure-treated 2x6 lumber: Approximately 50 linear feet
  • Roofing material (e.g., asphalt shingles): As needed
  • Siding material (e.g., vinyl siding): As needed
  • Plywood or OSB sheathing: As needed
  • Galvanized screws and nails
  • Exterior paint or stain
  • Door and window (optional)
  • Foundation materials (concrete, gravel, or pressure-treated skids)

Disclaimer: This document provides general guidance only. Always consult with local building codes and regulations before commencing any construction project. Seek professional advice if you lack experience in construction. Safety precautions should be followed at all times during the construction process.

Read more ►

Affordable 8x12 Storage Shed Plans for Maximum Organization

0 comments
Affordable 8x12 Storage Shed Plans for Maximum Organization

Affordable 8x12 Storage Shed Plans for Maximum Organization

Hey there, fellow storage enthusiasts! Are you drowning in stuff? Does your garage look more like a disaster zone than a parking space? You're not alone! Many of us struggle with storage, especially when space is limited. But what if I told you that you could build your own affordable and highly organized 8x12 storage shed? It might sound daunting, but it's totally doable, and I'm here to help you every step of the way.

Why an 8x12 Shed is the Sweet Spot

An 8x12 shed strikes a fantastic balance. It’s big enough to be truly useful, providing ample storage space for a variety of items, yet it remains relatively compact and manageable to build. You'll avoid the expense and complexity of a much larger structure while still gaining significant storage capacity compared to smaller sheds. Think of all the things you can store:
  • Lawn mowers and gardening tools
  • Seasonal decorations (finally a place for that inflatable Santa!)
  • Sporting equipment (bye-bye clutter in the garage!)
  • Extra furniture and household items
  • Workshop supplies (for those DIY projects you've been dreaming of!)

Keeping it Budget-Friendly: Smart Material Choices

Building a shed doesn't have to break the bank. The key is smart planning and choosing affordable materials without compromising on quality.

The Foundation: Keeping it Simple

Forget expensive concrete slabs! A gravel base is a fantastic, budget-friendly option. It’s easy to create, provides excellent drainage, and is surprisingly durable. Simply level the ground, add a layer of gravel, compact it, and you're good to go! This alone can save you hundreds of dollars.

The Structure: Wood vs. Metal

This is a big decision! Pressure-treated lumber offers a classic, customizable look and is relatively inexpensive. Metal sheds, while often more expensive upfront, can be more durable and require less maintenance in the long run. Carefully weigh the pros and cons and choose what best fits your budget and building skills.

Siding and Roofing: Economical Options

When it comes to siding, consider using affordable options like vinyl or composite. They are relatively inexpensive, require minimal maintenance, and come in various colors. For the roof, metal roofing is a fantastic choice. It's durable, lightweight, and can last for decades, making it a wise long-term investment despite the slightly higher initial cost. However, asphalt shingles are a more traditional and often cheaper option.

Maximizing Organization Within Your 8x12 Shed

Building the shed is only half the battle; organization is key to truly maximizing its potential.

Shelving: The Foundation of Order

Think vertically! Installing shelves is a game-changer. You can build your own shelves using affordable lumber, or you can purchase pre-made shelving units. Consider different shelf heights to accommodate various items. Don’t forget to add labels to your shelves so you know exactly where everything is.

Bins and Containers: Conquer the Clutter

Clear plastic bins are your best friend. They allow you to easily see what's inside, keeping your shed tidy and making it a breeze to find what you need. Label them clearly! Consider investing in some heavy-duty, weatherproof bins for outdoor equipment.

Pegboards: A DIYer's Dream

Pegboards are incredibly versatile for organizing tools and small items. You can hang them on the walls and add hooks, containers, and shelves to customize your storage needs. This allows for easy access and a clutter-free space.

Workbenches: The Hub of Activity

If you plan on using your shed for projects, a workbench is an absolute must. It creates a dedicated workspace and keeps your tools organized. You can build one yourself or purchase a pre-made workbench â€" there are options to suit every budget.

Finding Affordable 8x12 Shed Plans

You don't need to pay for expensive, professionally designed plans. There are tons of free resources online! Look for:
  • Free plans on websites like Instructables and Pinterest: These offer a variety of designs, allowing you to choose one that best suits your needs and skill level. Remember to check the reviews before you start building.
  • DIY blogs and YouTube tutorials: Many experienced DIYers share their shed-building journeys online, providing detailed instructions and helpful tips.
  • Your local library: Believe it or not, your local library might have books with shed plans.
Remember to always adapt the plans to your available materials and budget. Don’t be afraid to get creative!

Building Your Shed: A Step-by-Step Approach (Simplified)

While a detailed walkthrough would take an entire book, here’s a simplified overview: 1. Preparation is Key: Secure all necessary permits, level your ground, and gather your materials. 2. Lay the Foundation: Construct your gravel base or chosen foundation type. 3. Build the Frame: This is the structural backbone of your shed. Follow your chosen plans carefully. 4. Add the Siding and Roofing: Protect your shed from the elements. 5. Install Doors and Windows: Ensure easy access to your storage space. 6. Interior Finishing: Install shelving, pegboards, and any other organizational features.

Frequently Asked Questions

Q: Do I need a building permit to build an 8x12 shed?

A: It depends on your local regulations. Check with your city or county building department before you start. They can tell you whether you need a permit and what the requirements are.

Q: How long does it take to build an 8x12 shed?

A: This varies widely depending on your experience, the complexity of the plan, and the weather. A weekend warrior might take several weekends, while an experienced builder could potentially finish in a week or less.

Q: How much does it cost to build an 8x12 shed?

A: The cost depends heavily on material choices. A basic shed could cost anywhere from a few hundred to a few thousand dollars. Careful planning and smart material choices are crucial for keeping costs down.

Q: What tools will I need?

A: This will depend on your chosen plans but generally, you'll need basic carpentry tools like a hammer, saw, level, drill, measuring tape, and potentially a post hole digger for a more permanent foundation.

Q: Can I build a shed by myself?

A: While it's possible, having a helping hand can significantly speed up the process and make the project less strenuous. For bigger or more complex sheds, it's often recommended to have a friend or two assist.

Building your own 8x12 storage shed is a rewarding experience. It allows you to create a customized storage solution that perfectly fits your needs and budget, while also saving you a substantial amount of money compared to purchasing a pre-built shed. With careful planning and a little elbow grease, you can conquer your clutter and enjoy a beautifully organized, functional space for years to come!
Read more ►

Create More Space with These Easy 8x12 Lean-To Shed Plans

0 comments
Create More Space with These Easy 8x12 Lean-To Shed Plans

Create More Space with These Easy 8x12 Lean-To Shed Plans

The desire for additional storage or workspace is a common challenge faced by homeowners. Traditional shed construction can be both time-consuming and expensive, often requiring specialized tools and significant construction experience. A lean-to shed, however, offers a compelling alternative. These simple structures, attached to an existing building, provide a practical solution for expanding usable space without the complexities of a freestanding shed. This comprehensive guide provides detailed plans for constructing an efficient and durable 8x12 lean-to shed, perfect for various applications, from garden storage to a home workshop.

I. Planning and Preparation: Laying the Foundation for Success

Before commencing construction, meticulous planning is paramount. This phase ensures a smooth and efficient building process, minimizes errors, and maximizes the longevity and functionality of your lean-to shed. Thorough preparation is the cornerstone of a successful project.

A. Site Selection and Assessment

The ideal location for your lean-to shed should consider several factors. Accessibility is crucial, ensuring easy access for material delivery and future use. Proximity to a power source can be beneficial for workshop applications. Assess the ground conditions, noting any potential drainage issues or uneven terrain. Finally, ensure the chosen location complies with all relevant building codes and regulations in your area.

B. Material Selection: Choosing Quality Materials for Durability

The longevity and stability of your lean-to shed are directly correlated to the quality of materials used. Opt for pressure-treated lumber for the foundation and framing to resist rot and insect damage. For roofing, consider asphalt shingles for their affordability and ease of installation, or metal roofing for enhanced durability and longevity. Choose appropriate fasteners, ensuring they are compatible with the chosen materials and designed for outdoor use. A detailed materials list, specifying quantities, is essential for accurate budgeting and purchasing.

C. Obtaining Necessary Permits

Check with your local building department to ascertain whether permits are required for the construction of your lean-to shed. Failure to obtain necessary permits can result in significant fines and potential demolition orders. The permit application process typically involves submitting detailed plans and specifications of your project, including dimensions, materials, and foundation type. Allow sufficient time for the review and approval process.

II. Construction: A Step-by-Step Guide to Building Your Lean-To Shed

The following steps outline the construction process of an 8x12 lean-to shed. Remember to prioritize safety throughout the entire process, wearing appropriate personal protective equipment (PPE), such as safety glasses and work gloves.

A. Foundation Construction: Creating a Stable Base

A solid foundation is crucial for the stability and longevity of your shed. For an 8x12 lean-to, a concrete slab or a compacted gravel base provides an excellent foundation. Ensure the base is level and adequately sized to support the structure. For a concrete slab, consult with a concrete contractor for professional installation. A compacted gravel base involves excavating the designated area, adding gravel in layers, and compacting each layer thoroughly.

B. Framing the Structure: Building the Skeleton of Your Shed

The framing process involves constructing the wall and roof frames using pressure-treated lumber. Begin by building the base frame, ensuring it's square and level. Then, erect the wall frames, ensuring they are plumb and properly braced. For the roof frame, use appropriate angles to create the desired lean-to slope. Proper bracing is essential to ensure structural integrity and withstand various weather conditions.

C. Roofing: Protecting Your Shed from the Elements

After completing the framing, install the roofing material. Begin by laying down underlayment to provide an additional layer of protection against moisture. Then, install the chosen roofing material, following the manufacturer's instructions carefully. Ensure proper overlapping and sealing to prevent leaks. Proper roof ventilation is also essential to prevent moisture buildup and potential damage.

D. Siding and Finishing: Adding the Finishing Touches

Once the roof is completed, install the siding material. This can be wood, vinyl, or metal siding, depending on your preference and budget. Ensure proper sealing around windows and doors to prevent water infiltration. Add finishing touches, such as trim and weather stripping, to enhance the shed's aesthetic appeal and weather resistance.

E. Door and Window Installation: Enhancing Accessibility and Ventilation

Install doors and windows, ensuring they are properly secured and sealed. Choose appropriately sized doors and windows based on your intended use of the shed. Consider the placement of windows to maximize natural light and ventilation.

III. Safety Precautions and Considerations

Safety should be a paramount concern throughout the entire construction process. Always follow these important safety precautions:

  • Wear appropriate personal protective equipment (PPE), including safety glasses, work gloves, and hearing protection.
  • Use proper lifting techniques to avoid injuries.
  • Ensure the work area is well-lit and free of obstructions.
  • Use caution when working with power tools.
  • Inspect tools regularly for damage or wear.
  • Follow all manufacturer's instructions for tools and materials.
  • Consult with a professional if you encounter any unforeseen challenges.

IV. Customization and Expansion: Adapting to Your Needs

The provided plans serve as a foundation for your 8x12 lean-to shed. Feel free to customize it to better suit your individual needs and preferences. Consider adding shelving units, workbenches, or electrical outlets, depending on your intended use. The flexibility of a lean-to shed allows for easy expansion and adaptation to changing needs over time.

By following these detailed plans and adhering to safety guidelines, you can successfully construct a functional and durable 8x12 lean-to shed, effectively expanding your usable space and enhancing the functionality of your property. Remember to always consult local building codes and regulations before starting your project.

Read more ►

How to Build a Sturdy 6x8 Shed Roof: Step-by-Step Plans

0 comments
How to Build a Sturdy 6x8 Shed Roof: Step-by-Step Plans

Building a Sturdy 6x8 Shed Roof: A Comprehensive Guide

Constructing a shed roof, while seemingly straightforward, requires meticulous planning and execution to ensure stability and longevity. This comprehensive guide provides a step-by-step process for building a robust 6x8 shed roof, emphasizing crucial details often overlooked in simpler instructions. This guide assumes a basic understanding of carpentry and the use of power tools. Always prioritize safety and wear appropriate personal protective equipment (PPE) throughout the entire process.

Phase 1: Planning and Preparation

1.1 Determining Roof Style and Materials

For a 6x8 shed, a simple gable roof is ideal due to its simplicity and effectiveness in shedding water. Other options exist, such as a lean-to or pent roof, but a gable roof offers superior weather protection. Consider the following:

  • Roof Pitch: A steeper pitch (e.g., 4:12 or 6:12) allows for better water runoff, especially in areas with heavy snowfall. A shallower pitch (e.g., 3:12) is simpler to construct but may require more robust weatherproofing.
  • Roofing Material: Asphalt shingles are a popular and cost-effective choice for shed roofs. Other options include metal roofing (more durable but more expensive), corrugated plastic (lightweight and inexpensive but less durable), and wood shingles (aesthetically pleasing but require more maintenance).
  • Lumber Selection: Pressure-treated lumber is essential for the framing to resist rot and insect damage. Use appropriately graded lumber for each component â€" stronger lumber for load-bearing members (e.g., rafters, ridge board) and standard grade for other components (e.g., sheathing).

1.2 Calculating Material Quantities

Accurate material calculation prevents costly overages and frustrating shortages. Use a roofing calculator or consult a building supply professional. Factors to consider include:

  • Rafter Length: This depends on the shed's width (8 feet) and the chosen roof pitch. Use the Pythagorean theorem or a rafter calculator to determine the exact length, accounting for overhang.
  • Number of Rafters: Space rafters appropriately (typically 16" to 24" on center) to ensure adequate support. This calculation will dictate the lumber quantity.
  • Sheathing: Calculate the area of the roof to determine the quantity of plywood or OSB sheathing required. Factor in overlaps and waste.
  • Underlayment: This waterproof membrane is crucial beneath the roofing material. Calculate the roof area to determine the quantity needed.
  • Roofing Material: Use manufacturer's guidelines to determine the amount of shingles or other roofing material needed based on the roof area and shingle coverage.

1.3 Site Preparation and Tools

Ensure a level and stable foundation for the shed. The ground should be compacted to prevent settling. Gather the necessary tools, including:

  • Measuring Tape
  • Level
  • Circular Saw
  • Drill/Driver
  • Hammer
  • Safety Glasses
  • Work Gloves
  • Nail Gun (optional, but highly recommended for efficiency)
  • Scaffolding (for safe roof access)

Phase 2: Roof Framing

2.1 Constructing the Rafters

Cut rafters to the calculated length, ensuring accurate cuts for proper fit and pitch. Use a speed square to ensure precise angles. Pre-drill holes for nails or screws to prevent splitting the lumber.

2.2 Installing the Ridge Board

The ridge board forms the highest point of the roof. Position it precisely along the center line of the shed, ensuring it is level. Secure it to the top plates of the shed's side walls using appropriate fasteners.

2.3 Attaching the Rafters

Carefully lift and attach the rafters to the ridge board and the side walls (wall plates). Use appropriate fasteners (nails or screws) and ensure proper spacing and alignment. Use temporary supports to hold the rafters in place until fully secured.

Phase 3: Sheathing and Underlayment

3.1 Installing Roof Sheathing

Install the plywood or OSB sheathing over the rafters, ensuring proper overlapping and alignment. Use galvanized nails or screws for secure fastening. Check for squareness and levelness throughout the process.

3.2 Applying Underlayment

Lay the underlayment (e.g., felt paper or synthetic membrane) over the sheathing, ensuring complete coverage and proper overlapping. This critical layer protects the roof structure from moisture damage.

Phase 4: Roofing Installation

4.1 Installing Roofing Material

Follow the manufacturer's instructions for installing the chosen roofing material (e.g., asphalt shingles, metal roofing). Ensure proper nailing or fastening to prevent wind damage. Pay close attention to flashing around vents, chimneys (if applicable), and edges to prevent water penetration.

4.2 Final Inspections and Cleanup

Once the roofing material is installed, perform a thorough inspection for any loose fasteners, damaged shingles, or gaps in the underlayment. Address any issues promptly. Finally, clean up the construction debris and dispose of it properly.

Phase 5: Important Considerations

Wind Loads: Design the roof to withstand anticipated wind loads in your area. Consult local building codes for specific requirements. Stronger framing members and appropriate fastening techniques are crucial for high-wind areas.

Snow Loads: In regions with significant snowfall, the roof design must accommodate the weight of accumulated snow. A steeper roof pitch helps shed snow, reducing the load on the structure. Consult local building codes for snow load requirements.

Building Codes: Always adhere to local building codes and regulations. These codes ensure structural integrity, safety, and compliance with local ordinances.

Professional Assistance: If you lack experience in construction, consider seeking assistance from a qualified professional. Improper construction can lead to structural problems and costly repairs.

Building a sturdy shed roof requires careful planning, precise measurements, and attention to detail. By following these steps and adhering to safety precautions, you can create a durable and weather-resistant roof that will protect your shed for years to come.

Read more ►

Cost and Materials for 6x8 Shed Plans: A Complete Guide

0 comments
Cost and Materials for 6x8 Shed Plans: A Complete Guide

Cost and Materials for 6x8 Shed Plans: A Complete Guide

So, you're thinking about building a 6x8 shed? That's awesome! It's a fantastic project that can add serious value to your property, whether you need extra storage, a workshop space, or just a quiet little retreat. But before you grab your hammer, let's talk about the nitty-gritty: cost and materials. This guide will walk you through everything you need to know, making the process as clear and straightforward as possible.

Estimating the Overall Cost

The total cost of your 6x8 shed project will vary wildly depending on several factors. There's no single magic number I can give you, but let's break down the major expense categories to help you create a realistic budget.

Material Costs

This is where the bulk of your money will go. We're talking lumber, roofing, siding, hardware, and more. A rough estimate for a basic 6x8 shed, using pressure-treated lumber and standard materials, could range from $500 to $1500. This is a wide range, I know, and that’s because the cost of lumber fluctuates significantly depending on your location and the time of year. High-quality materials, like cedar or redwood, will obviously push you toward the higher end of that range.

Labor Costs

Are you doing this yourself, or hiring someone? If you're tackling this project solo (which is totally doable!), your labor costs are essentially your time. Factor in the time you'll spend planning, shopping for materials, and actually building. If you're hiring a contractor, expect to pay significantly more. The cost of labor can easily double or even triple your material costs, depending on your location and the contractor's rates. Get multiple quotes before committing.

Permits and Inspections

This is often an overlooked expense. Check with your local building department to see if you need a permit to build a shed. Permits aren't always required for small structures, but it's better to be safe than sorry. The cost of permits can vary greatly depending on your location, but you should budget at least $100-$300.

Unexpected Expenses

Let's be realistic â€" things don't always go according to plan. You might need to replace a damaged piece of lumber, buy additional fasteners, or run into unexpected issues with the foundation. It's always wise to add a 10-20% buffer to your budget to cover these unforeseen costs.

Detailed Materials List: What You'll Need

Now let's delve into the specifics of the materials you'll need. This list is a general guideline; your exact quantities will depend on your specific shed design and the dimensions of your lumber. Always double-check your measurements and purchase slightly more than you think you'll need to account for cuts and mistakes.

Lumber

  • Pressure-treated 4x4 posts: For the foundation and corner posts. The exact number will depend on your foundation design.
  • Pressure-treated 2x4s: For the wall framing, roof framing, and bracing. You'll need a considerable amount, so accurately calculate your needs based on your plans.
  • Pressure-treated 2x6s: Possibly for the floor joists, depending on your design. Again, accurate calculations are key.
  • Plywood or OSB (Oriented Strand Board): For the sheathing (covering the wall and roof framing).
  • T&G (Tongue and Groove) subflooring: For the shed floor, providing a smooth and durable surface.

Roofing Materials

  • Roofing Felt (tar paper): A crucial underlayment to protect against leaks.
  • Shingles (asphalt, metal, or other): Choose a roofing material that suits your budget and aesthetic preferences.
  • Roofing Nails: Galvanized roofing nails are best for longevity.

Siding Materials

  • Siding (vinyl, metal, wood): Select a siding material that matches your style and budget.
  • Siding Nails or Screws: Use the appropriate fasteners for your chosen siding.

Hardware and Fasteners

  • Various Screws (wood screws, sheet metal screws): Get a good variety of sizes and types.
  • Nails (framing nails, finishing nails): Purchase several sizes and types.
  • Hinges: For the shed door(s).
  • Handles and Latches: For securing the door(s).
  • Concrete mix (or concrete blocks): For the foundation.

Other Materials

  • Paint or Stain (optional): To protect and beautify the shed.
  • Caulk: To seal gaps and prevent drafts.
  • Window(s) (optional): Add natural light and ventilation.

Where to Buy Your Materials

You'll likely need to visit several stores to get everything you need. Home improvement stores like Home Depot or Lowe's are excellent options for most of your materials. Consider checking out local lumberyards as well; they might offer better prices on some items, especially lumber. For specialized items like roofing or siding, you might need to visit a supplier specializing in those materials.

Tips for Saving Money

Building a shed can be expensive, but there are ways to keep costs down:

  • Shop around for materials: Compare prices at different stores before buying.
  • Consider using reclaimed or repurposed materials: This can significantly reduce costs, adding character to your shed.
  • Build a simpler shed design: Avoid overly complex designs that require more materials and labor.
  • Do the work yourself: This is the biggest cost-saver. If you're handy, building the shed yourself will drastically reduce the overall expense.
  • Plan carefully and measure twice, cut once: Minimize waste by carefully planning your cuts.

Commonly Asked Questions

Here are some questions I frequently get about building a 6x8 shed:

Q: Do I need a permit to build a 6x8 shed?

A: It depends on your local building codes. Check with your local building department to determine if a permit is required. It's always better to be safe and check beforehand.

Q: How long does it take to build a 6x8 shed?

A: This depends on your experience and the complexity of the design. A basic shed could take a weekend for an experienced builder, but could take several weeks for a beginner. Factor in ample time.

Q: What kind of foundation do I need?

A: A simple concrete slab or pier foundation is usually sufficient for a 6x8 shed. The best option depends on your soil conditions and local building codes.

Q: What's the best type of wood to use?

A: Pressure-treated lumber is the most common and recommended choice for outdoor structures due to its resistance to rot and insects. Cedar and redwood are also good options, but more expensive.

Q: Can I build a 6x8 shed by myself?

A: Absolutely! With careful planning, the right tools, and a little patience, it's a manageable project for a DIYer. It helps to have some basic carpentry skills.

Building your own 6x8 shed can be a rewarding and cost-effective way to add valuable space to your property. By carefully planning your budget, gathering the necessary materials, and following these guidelines, you'll be well on your way to creating the perfect outdoor storage solution.

Read more ►

Sunday, November 17, 2024

Simple and Affordable 8x6 Shed Plans for Outdoor Storage

0 comments
Simple and Affordable 8x6 Shed Plans for Outdoor Storage

Build Your Dream 8x6 Shed: Simple, Affordable Plans for Outdoor Storage

Hey there, fellow DIY enthusiasts! So, you're dreaming of a neat and tidy outdoor space, but that overflowing garage or cluttered backyard is driving you nuts? I get it! That’s why I'm sharing these simple and affordable 8x6 shed plans with you. We're going to build something practical, sturdy, and best of all, within your budget. Let's dive in!

Why an 8x6 Shed is Perfect for Many Needs

An 8x6 shed might seem small at first glance, but trust me, it's surprisingly spacious. It's the Goldilocks size â€" not too big, not too small â€" perfect for a variety of uses. Think about it: lawnmowers, garden tools, bikes, outdoor furniture, holiday decorations... all that stuff you're currently tripping over can finally have a home! This size is also manageable for a DIY project, even if you're a beginner. No need to hire expensive contractors â€" you can conquer this project yourself!

Choosing Your Materials: Keeping it Budget-Friendly

One of the most crucial aspects of building an affordable shed is smart material selection. You don't need to use the most expensive lumber; pressure-treated pine or even reclaimed wood (if you can find it!) work perfectly fine. Here's a breakdown:

Lumber:

You'll need pressure-treated lumber for the base and floor joists to withstand ground contact and moisture. For the walls and roof, standard lumber will do. Try to buy in bulk for discounts, and don't forget to factor in extra for cuts and mistakes (we all make them!).

Roofing:

Asphalt shingles are a classic and relatively inexpensive choice. Consider the climate â€" if you get a lot of snow, you might want to opt for a slightly heavier shingle. Other budget-friendly options include metal roofing or even recycled plastic roofing.

Other Essentials:

Don't forget about screws, nails, concrete for the foundation (unless you're doing a gravel base), a level, measuring tape, saw, and possibly a drill. A good quality toolbox is an investment that will pay off in the long run for many future projects.

Simple 8x6 Shed Plans: A Step-by-Step Guide

This isn't a detailed blueprint (you'll need to find those online or in a home improvement book!), but a general overview to guide you. Remember safety first! Wear safety glasses and gloves throughout the project.

Step 1: Preparing the Foundation:

This is crucial for a stable shed. You can opt for a concrete slab, a gravel base, or even concrete blocks. Ensure the ground is level before beginning. This step might require some digging and leveling, so be prepared for some physical work.

Step 2: Building the Frame:

Assemble the floor frame using pressure-treated lumber. Once secured, build the walls, making sure they are square and plumb (perfectly vertical). You can use pre-cut lumber to simplify this process if your budget allows.

Step 3: Raising the Walls:

Carefully lift the walls onto the floor frame, securing them with braces until you can attach them permanently. Having a helper for this step is highly recommended!

Step 4: Roofing Construction:

Construct the roof frame, ensuring proper slope for water drainage. Once the frame is secure, install your chosen roofing material.

Step 5: Siding and Finishing Touches:

Add the siding (can be simple plywood or more decorative materials), install a door, and add any windows you desire. Consider painting or staining your shed for extra protection and aesthetic appeal.

Tips for Staying Within Budget

Building affordably isn't about sacrificing quality; it's about making smart choices. Here are some more tips to keep your costs low:

  • Shop around for materials: Compare prices at different home improvement stores and lumberyards.
  • Consider reclaimed lumber: Repurposing old wood is environmentally friendly and can save you a lot of money.
  • Do the work yourself: This is the biggest cost-saver. Get friends to help for extra hands (and pizza!).
  • Prioritize essential features: Focus on the basics first, adding extra features later if your budget allows.
  • Buy tools gradually: If you don't already own all the tools, consider borrowing or renting some instead of buying them all at once.

Beyond the Basics: Adding Personal Touches

Once your basic shed is built, you can personalize it to fit your needs and style! Think about adding:

  • Shelving for organized storage
  • A workbench for projects
  • Ventilation to prevent moisture buildup
  • A lock for security
  • Exterior lighting for evening access

Remember, this is *your* shed. Make it reflect your personality and practical needs!

Frequently Asked Questions

I know you might have questions, so let’s tackle some common ones:

Q: Do I need a building permit?

A: This depends entirely on your local regulations. Check with your city or county's building department before starting construction. It's better to be safe than sorry!

Q: How long will it take to build?

A: The construction time varies based on your experience and the pace you work at. Expect to spend several weekends, or a week or two of dedicated time.

Q: Can I build this shed alone?

A: While possible, it's significantly easier with a helper, especially for lifting and securing larger components.

Q: What if I make a mistake?

A: Don't panic! Everyone makes mistakes. Take your time, carefully measure, and don’t be afraid to ask for help or advice. Minor errors are often fixable. The learning process is part of the fun!

I hope these plans and tips inspire you to build your own fantastic 8x6 shed! Happy building!

Read more ►
 

Copyright © Backyard Shed DIY Guide Design by O Pregador | Blogger Theme by Blogger Template de luxo | Powered by Blogger