8x6 Shed Building Plans for Easy DIY Backyard Projects
Constructing a backyard shed offers a multitude of benefits, from providing additional storage space to enhancing the aesthetic appeal of your property. An 8x6 shed, while compact, represents a manageable project for DIY enthusiasts with basic construction skills. This comprehensive guide provides detailed plans and instructions, enabling you to successfully build your own 8x6 shed, transforming your outdoor space with a practical and visually pleasing addition.
I. Planning and Preparation: Laying the Foundation for Success
Before commencing construction, meticulous planning is paramount. This phase involves several crucial steps that will significantly impact the final outcome and the ease of the building process.
A. Site Selection and Preparation
Choosing the ideal location for your shed is crucial. Consider factors such as proximity to utilities, accessibility for material delivery, and sun exposure. Ensure the chosen site is level and free from obstructions. This might involve clearing vegetation, removing rocks, and leveling the ground using compacted gravel or a concrete slab, depending on your chosen foundation type.
B. Material Selection and Acquisition
Selecting high-quality materials is essential for longevity and structural integrity. This includes pressure-treated lumber for the frame, robust roofing material (e.g., asphalt shingles or metal roofing), and appropriate fasteners. Create a detailed materials list, accounting for all necessary components, including screws, nails, and any additional hardware. Consider purchasing materials in bulk to potentially save on costs. Accurate measurements are critical; double-check your calculations to avoid purchasing excess or insufficient materials.
C. Permitting and Regulations
Check local building codes and regulations regarding shed construction. Some jurisdictions require building permits for structures exceeding a certain size or exceeding a specific height. Obtaining the necessary permits in advance prevents potential delays and legal complications. Familiarize yourself with any specific requirements related to foundation type, materials, and structural design.
II. Foundation Construction: Establishing a Stable Base
The foundation serves as the bedrock of your shed, ensuring stability and preventing settling. Several foundation options are suitable for an 8x6 shed, each offering different levels of complexity and permanence.
A. Concrete Slab Foundation
A concrete slab foundation provides exceptional stability and longevity. It requires excavation to a specified depth, followed by the placement of a reinforced concrete slab. This option is ideal for heavier sheds and locations with potentially unstable soil. Accurate leveling is crucial to ensure the shed sits evenly.
B. Gravel Base Foundation
A gravel base offers a simpler and less expensive alternative. It involves excavating a shallow pit, filling it with compacted gravel, and leveling the surface. This option is suitable for lighter sheds and well-drained soil. While less expensive, it may offer less stability compared to a concrete slab.
C. Wooden Skids Foundation
For temporary or easily movable sheds, a foundation of pressure-treated wooden skids provides a straightforward solution. These skids act as supports, elevating the shed above the ground. This approach is suitable for sheds intended for portability or locations with challenging ground conditions where excavation is difficult. Ensure the skids are properly spaced and level.
III. Frame Construction: Building the Shed's Skeleton
The frame construction involves assembling the shed's skeletal structure, providing the essential support for walls, roof, and other components. Accuracy in cutting and assembling the frame members is critical for a structurally sound shed.
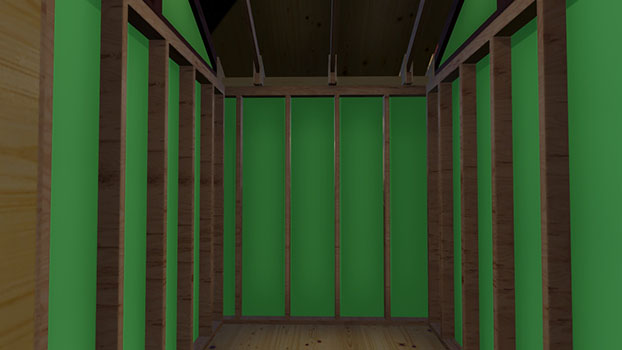
A. Wall Framing
Begin by constructing the wall frames using pressure-treated lumber. Accurate measurements are crucial. Ensure the framing members are plumb and square, using a level and square to verify alignment. Proper bracing is essential to maintain structural rigidity.
B. Floor Framing
Construct the floor frame using pressure-treated lumber, ensuring levelness and proper support. The floor joists should be appropriately spaced and securely fastened to the frame. Consider using plywood or OSB for the flooring surface, ensuring it's securely attached to the framing.
C. Roof Framing
The roof framing involves constructing the rafters, ensuring proper slope and support. The type of roof (e.g., gable, shed) will dictate the specific framing techniques required. Properly securing the rafters to the wall plates is critical for roof stability. Ensure the rafters are adequately spaced and braced for wind and snow loads.
IV. Cladding and Roofing: Enclosing and Protecting Your Shed
The cladding and roofing phases involve covering the frame, providing weather protection and enhancing the shed's aesthetic appeal. Proper installation is essential for water resistance and longevity.
A. Wall Cladding
Choose appropriate cladding material, such as shiplap, plywood, or vinyl siding. Install the cladding following the manufacturer's instructions, ensuring proper overlapping and sealing to prevent water ingress. Maintain consistent spacing and alignment for a neat and professional finish.
B. Roofing Installation
Install the chosen roofing material (e.g., asphalt shingles, metal roofing) according to the manufacturer's instructions. Ensure proper underlayment is used for water protection. Pay close attention to sealing around vents, chimneys, and other penetrations. Proper flashing is crucial to prevent water leakage.
V. Doors and Windows: Enhancing Functionality and Aesthetics
Installing doors and windows adds functionality and improves the shed's usability. Careful measurements and proper installation are key for a smooth and effective operation.
A. Door Installation
Choose a suitable door (e.g., solid-core, hollow-core) and carefully follow the manufacturer's instructions for installation. Ensure proper alignment and secure fastening to the frame. Consider adding weatherstripping for improved insulation and weather resistance.
B. Window Installation
Install windows, ensuring proper sealing and weatherproofing to prevent drafts and water leakage. Consider the placement and size of windows to optimize natural light and ventilation. Securely fasten the windows to the frame, ensuring proper alignment and operation.
VI. Finishing Touches: Enhancing Durability and Appearance
Final touches significantly improve the shed's durability and visual appeal. These steps ensure the longevity of your project.
A. Painting or Staining
Apply a protective coat of paint or stain to the exterior of the shed to protect the wood from the elements and enhance its aesthetic appeal. Use a high-quality exterior-grade paint or stain suitable for pressure-treated lumber. Allow sufficient drying time between coats.
B. Interior Finishing
If desired, finish the interior of the shed with paint, shelving, or other features to enhance its functionality and usability. Consider adding insulation for improved temperature control. Proper ventilation should be considered if insulation is added.
Building an 8x6 shed is a rewarding DIY project that offers valuable experience and a practical addition to your property. By carefully following these plans and prioritizing safety and precision, you can create a durable and attractive structure to serve your storage needs for years to come. Remember to always prioritize safety by using appropriate safety equipment and adhering to best practices throughout the construction process.


0 comments:
Post a Comment
Note: Only a member of this blog may post a comment.