DIY Wood Pallet Shed: A Sustainable Storage Solution for Your Yard
Tired of clutter overflowing your garage or garden shed? Craving a charming, eco-friendly storage solution that adds character to your outdoor space? Building your own shed from reclaimed wood pallets offers a fantastic blend of sustainability, affordability, and personalized style. This guide provides a step-by-step approach to crafting a sturdy and attractive pallet shed, transforming discarded materials into a valuable asset for your property.
Planning Your Pallet Shed Project
Before you begin hammering nails, careful planning ensures a successful build. First, determine the size and dimensions of your desired shed. Consider the storage needs you want to fulfill, along with the available space in your yard. Next, source your pallets. Look for sturdy pallets made of untreated wood â€" inspecting them thoroughly for any signs of rot or pest infestation is crucial. Remember to obtain any necessary permits from your local authorities before beginning construction. Finally, sketch a basic design, noting the placement of walls, doors, and roof. A simple design is often best for a beginner, focusing on functionality over intricate details.
Gathering Your Materials and Tools
Building your pallet shed requires a blend of reclaimed and new materials. Beyond the pallets themselves, you’ll need strong screws or nails, pressure-treated lumber for the foundation (to prevent rot), roofing materials (tar paper, shingles, or metal sheeting), hinges and a latch for the door, and any desired paint or sealant. For tools, gather a hammer or impact driver, saw (circular saw or hand saw), measuring tape, level, drill, and safety glasses and gloves. Remember to prioritize safety throughout the project.
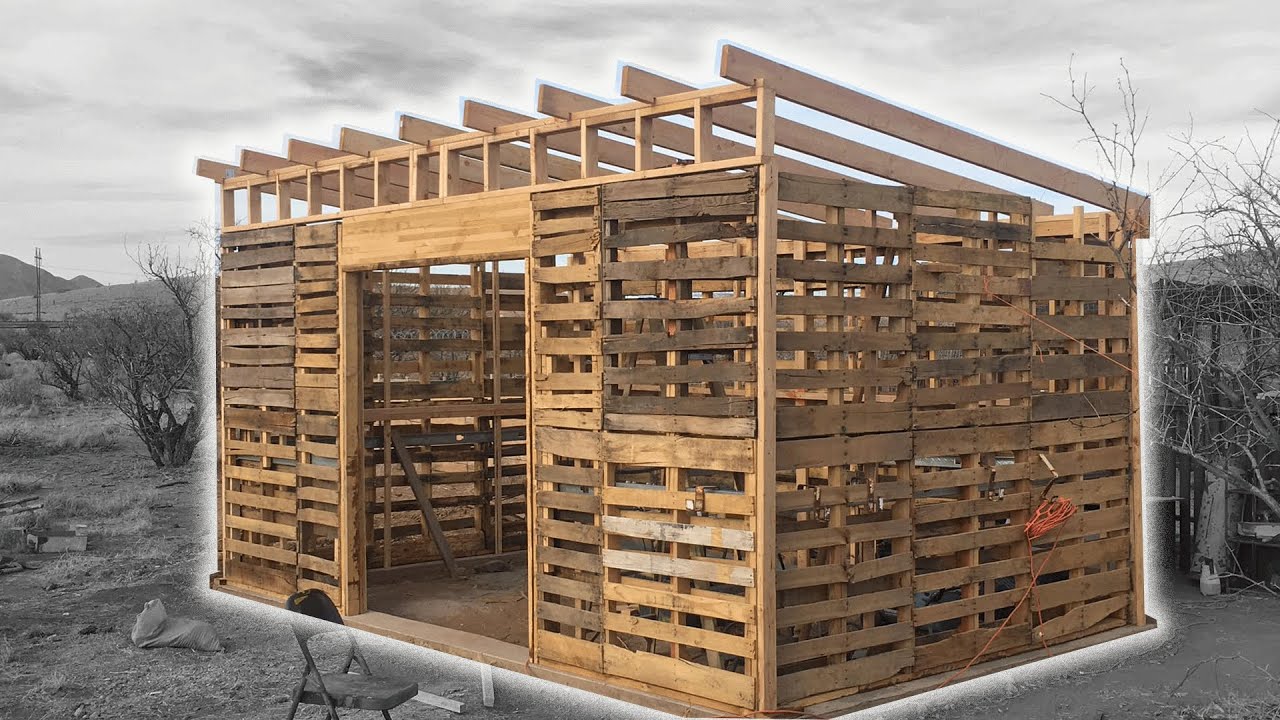
Constructing the Shed's Foundation and Frame
Building a Solid Base
Begin by creating a level foundation using pressure-treated lumber. This prevents the shed from sinking into the ground and ensures longevity. Construct a rectangular frame using the pressure-treated wood, anchoring it securely to the ground with concrete or stakes. Ensure the frame is perfectly level using a level to prevent structural issues later on.
Assembling the Pallet Walls
Next, begin assembling the pallet walls. This might involve dismantling some pallets to create consistent wall sections. Secure the pallets together using screws or strong nails, reinforcing the joints for added strength and stability. Remember to leave space for your door opening.
Erecting the Frame and Attaching Walls
Once the walls are assembled, carefully lift and attach them to the foundation frame, ensuring they are plumb and square. Use additional bracing to secure the walls firmly to the base. This is where a helping hand (or two) will prove invaluable.
Adding the Roof and Finishing Touches
The roof is a crucial element for protecting your stored items from the elements. Construct a simple gable or shed roof using additional lumber. Ensure the roof is properly sloped to allow for efficient water runoff. Cover the roof with your chosen roofing material, carefully sealing any gaps to prevent leaks. Finally, add the door using hinges and a latch. Consider applying a protective sealant or paint to the entire shed to enhance its lifespan and aesthetic appeal. Adding personal touches, such as a small window or decorative trim, can further personalize your creation.
Enjoy Your Sustainable Storage Solution!
Congratulations! You’ve successfully built your own unique and sustainable pallet shed. This project not only provides valuable storage space but also showcases your resourcefulness and commitment to eco-friendly practices. Enjoy the satisfaction of knowing you transformed discarded materials into a beautiful and functional addition to your yard. Remember to regularly maintain your shed, addressing any repairs promptly to ensure its long-term durability.
0 comments:
Post a Comment
Note: Only a member of this blog may post a comment.